

/Torch/CobTwist.foocad
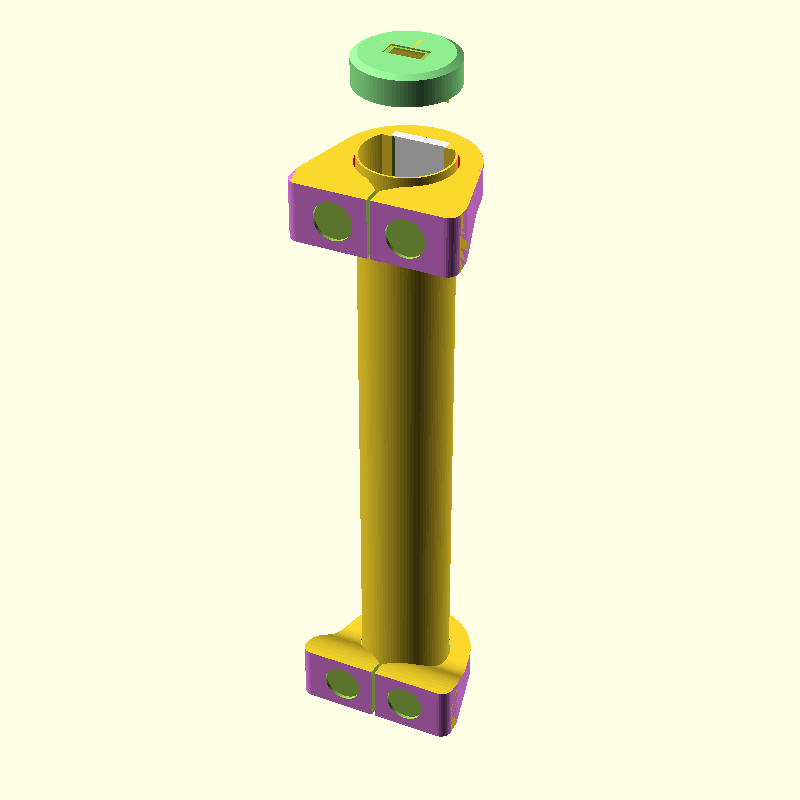
A torch with a wide COD LED strip which can lay flat on flat surface The light can be directed up/down by simply twisting the body.
Powered by a 18650 battery, through a boost circuit to raise to 12V needed for the LED cob. Includes a USB battery charge port at the other end to the on/off switch.
The feet can be taken on/off if required.
The feet include impressions for magnets to glued into.
The battery is held in place using a friction fit using tape to pad it out slightly. MI used masking tape because it has high friction. Ensure that you cover the terminals well. It could slide about! I also taped the end of the charger module to be extra safe, and the boost module is 100% protected by the "boostHolder" pieces.
Build parts
Build in several parts. Use the custom "piece" field : foot (x2) tube chargerEnd switchEnd boost (x2) (to secure the boost circuit within the tube) Required M3 bolts
Bought parts
A 18650 battery. I use 2nd hand ones from old laptops. Usually only one or two cells have died when the battery as a whole is dead. I don't tend to use torches for long periods, so a high capacity battery is a waste!
Search ebay (or other shop) for : usb battery charge module dc boost module mounting holes (3.x V to 12V no usb socket
FYI, The boost modules with mouting holes are becoming rarer. If you can't find any, the "boost" piece won't be of use.
Requirements
At least 17cm build height!
Possible Improvements
Add posts to the "buttonEnd", so that it can never rotate (twisting the wires)

Cut away the tube to allow space for the wires from the LED cob strip.
import static uk.co.nickthecoder.foocad.layout.v1.Layout2d.*
import static uk.co.nickthecoder.foocad.layout.v1.Layout3d.*

class CobTwist : AbstractModel() {

    // Size of the LED module
    @Custom
    var length = 173
    val width = 15.5
    var thickness = 2.7

    val buttonD = 13 // Old one was 16.5

    val endT=8
    val endBase=2
    val endChamfer=1
    val endExtra = 3
    val endSkin=0.8

    // Thickness of the tube walls. On a small extrusion this seems a little
    // flimsy, but the final result feels very rigid to me.
    val tubeT = 0.6
    val radius=13 // external radius of the tube

    // The boost module is 22 mm, so we need an internal radius of at least 11 mm
    fun internalRadius() = radius - tubeT

    val footT = 5 // Diff between internal and external radius of the foot.
    val magnetD = 11 // Diameter of the magnets on the feet (include some slack?)
    val magnetT = 1.0 // Thickness of the magnets (include some slack?)

    // For an interference fit between the tube and the ends.
    // I recommend gluing the ends on. You don't want anybody
    // shorting out the battery (lithium batteries are dangerous!)
    val slack = 0.3

    // I didn't include any slack at first. (I ussumed that the split nature
    // of the foot would suffice. However, the feet tend to turn the ends,
    // so a higher value may be better (0.4 maybe??? Testing for the first time...)
    val footSlack = 0.4

    //@Custom
    var text = ""

    @Piece
    fun others() : Shape3d {
        return (
            buttonEnd() +
            chargerEnd().translateX(30) +
            boostHolder().translateY(-3).rotateZ(180).also().translateX(60) +
            foot().tileX(2,5).translateY(-35)
            ).center()
    }


    // ==== FUNCTIONS BEGIN ====
    @Piece( printable = false )
    override fun build() : Shape3d {

        return buttonEnd() +
            chargerEnd().rotateX(180).translateZ(length+30) +
            tube().translateZ( endBase ) +
            led().translate( 0,10,endBase ) +
            battery().translateZ(30).translateY(-2) +
            foot() +
            foot().mirrorZ().translateZ(length)

    }

    // For debugging only.
    fun battery() = Cylinder( 65, 9 ).color("GhostWhite")

    // Used by the "chargerEnd" and "buttonEnd" pieces.
    // Goes on both ends of the tube. Each end is modified in different ways.
    fun end() : Shape3d {
        val outside = Circle( radius + slack + endSkin )
        val inside = Circle( radius + slack )

        return ExtrusionBuilder().apply {
            crossSection(Circle( radius + slack - endChamfer))
            forward(endChamfer)
            crossSection(outside)
            forward(endT-endChamfer)
            crossSection(outside)
            crossSection(inside)
            forward(-endT + endBase )
            crossSection(inside)
        }.build().color( "LightGreen" )
    }

    // The "chargerEnd" piece. Includes a hole and mounting post
    // for a usb charger module. Ensure you get one with no component on
    // one side, as you will be gluing it to a plastic post.
    @Piece
    fun chargerEnd() : Shape3d {
        val hole = Cube( 8.5, 3.5, endT*3 ).center()
        val floor = Cube( 18, 6, 10 ).centerXY().translateZ(0.9)
        val entry = Cube( 11, 5, 0.5).centerXY().translateZ(-0.1)

        // If you glue the charger module to the post with epoxy,
        // then these holes will give extra support.
        // If using super-glue, then don't include these holes, as they
        // will only reduce the surface area, and give no mechanical advantage.
        val holes = Cube(2,10,2)
            .tileX(2,5)
            .tileZ(2,5)
            .centerXY()
            .translateZ(3)

        val post = Cube( 20, 0.6, 13 ).centerX().translateY(-3.5) +
            Cube( 0.6, 5, 13 ).translateY(-8) -
            holes


        val indentText = Text( text, BOLD, 7 )
            .center()
            .mirrorX()
            .translateY(6.5)
            .extrude(0.6).translateZ( -0.01 )
            .color("Orange")

        return end() - hole - floor - entry - indentText + post
    }

    // The "buttonEnd" piece. Includes a hole for a button.
    // Note, my button's retaining ring fouled again the cob LED strip,
    // so I glued it in place.
    // Consider using a smaller diameter button!
    // NOTE. I should have added post(s) to prevent the end from rotating.
    // (to prevent wires getting twisted). I'll have to glue mine in place.
    fun buttonEnd() : Shape3d {
        val post = Cube(0.6, 8, 8).centerXY().translateX(10)
        return end() -
            Cylinder( 30, buttonD / 2).center() +
            post.mirrorX().also()
    }


    // Used for debugging only. Shows the size of the boost module, as well
    // as the mounting holes.
    fun boostModule() : Shape3d {
        val board = Cube( 43.5, 21.5, 1.5 ).color("Green")
        val components = Cube(43.5, 21.5, 10).translateZ(1.5).color("WhiteSmoke")

        val holes = Cylinder.hole( 20, 1.5 ).translate(15,-7.5,-1)
            .translate(-30,15,-1).also()
        return (board + components).centerXY() - holes
    }

    @Piece
    fun boosts() = boostHolder().translateY(-3).rotateZ(180).also()

    // The "boost" piece. Print two of them to secure and protect the boost
    // module. Requires two short M3 bolts (no nuts).
    @Piece
    fun boostHolder() : Shape3d {

        val thick = 0.6
        val height = 9
        val r = internalRadius() - slack

        val oversize = Cube( r * 3, r * 3, height ).centerXY()
        val snug = Circle( r ) - Square( radius * 2 ).centerX().translateY(2)
        val inside = Circle( r-1 )

        val block = Cube( 6,4,10 ).translate(-10,-2,0)
        val hole = Cylinder.hole(30,1.5).center().rotateZ(-90).rotateX(90).translate(-7.5,0,7.5)

        // val debug = boostModule().rotateZ(90).rotateX(90).translate(0,4,21.75+thick)

        // We make a "fake" chamfer at the bottom to prevent squishage of the
        // first layer making it too big to fit in the tube.
        val solid = (oversize - inside.extrude(height).translateZ(thick)) /
            (snug.extrude(height).translateZ(0.4) + snug.offset(-0.4).extrude(height))

        return block - hole + solid
    }

    // The "tube" piece.
    // I had no trouble printing it, despite being tall and narrow, it didn't
    // get knocked over during the print (and I did not use a brim).
    // Consider printing a small version (using @Custum length), and
    // check that your LED strip fit within.
    @Piece
    fun tube() : Shape3d {
        val up = 7.5
        val boardT = 2
        val apeture = 11

        val profile = (
            Square( radius*2+1 ).center() -    // Overly large square
            Circle( radius - tubeT ) +         // Internal circle
            Square( radius*2, 20 ).centerX().translateY( up-tubeT ) - // Fill in the top
            Square( width, boardT ).centerX().translateY( up ) - // Slot for LED
            Square( apeture, 10 ).centerX().translateY( up ) // Apeture for light
        ) / Circle( radius ).convexity(3)

        val removeForSolder = Cube( width, 10, 5 ).centerX()
            .hull( Cube( 2, 10, 6 ).centerX().translateZ(8) )
            .translateY(up)

        val removeForSolders = removeForSolder + removeForSolder.mirrorZ().translateZ(length)

        val removeForButton = Cylinder(21,10).translateZ(length-20)
        return profile.extrude( length ) - removeForSolders - removeForButton
    }

    // The "foot" piece. Print two identical copies.
    // These have a split design, so that they can be taken on/off easily
    // after the body of the torch is built.
    // I say "easily" - it takes a bit of brute force and coordination,
    // but there's no unsoldering involved (unlike the first design!)
    @Piece
    fun foot() : Shape3d {
        val internalR  = radius + slack + endSkin + footSlack
        val externalR = internalR + footT

        val extra = 8
        val foo = 47 // The width at floor level
        val thickness = 9 // Thickness at the top
        val thickness2 = 17 // Thickness at the bottom (Badly named!)

        val base = Square( foo, 10 ).roundAllCorners(3).centerX().translateY(-internalR-extra)
        val shape = (Circle( externalR ).hull(base)) // - Circle( internalR )

        val profile = PolygonBuilder().apply {
            moveTo(-externalR,0)
            lineTo(externalR+extra,0)
            lineTo(externalR+extra,thickness2)
            bezierTo(
                Vector2(externalR+extra-20,thickness2),
                Vector2(10,thickness),
                Vector2(0,thickness)
            )
            lineTo(-externalR,thickness)
        }.build()

        val center = ExtrusionBuilder().apply {
            forward(-0.1)
            crossSection( Circle( internalR - 1 ) )
            forward(1)
            crossSection( Circle( internalR ) )
            forward( thickness-2 )
            crossSection( Circle( internalR ) )
            forward(1)
            crossSection( Circle( internalR - 1 ) )
            forward(30)
            crossSection( Circle( internalR - 1 ) )
        }.build().color("Red")

        val inter = profile.extrude( foo ).centerZ().rotateX(90).rotateZ(-90)

        val split = (
                Square(1,extra+2).centerX() +
                Square(8).center().rotate(45).translateY(extra+3.5)
            )
            .extrude( thickness2+2 )
            .centerX()
            .translate(0,-internalR-extra-1,-1)

        val magnetHoles = Cylinder.hole( magnetT+0.1, magnetD/2 )
            .rotateX(90)
            .translateZ(thickness2/2)
            .translateY(-internalR-extra+magnetT)
            .translateX(10).mirrorX().also()

        return shape.extrude( thickness2 ).color( "Violet" ) / inter -
            center -
            magnetHoles -
            split
    }

    fun led() = Cube( width,thickness,length )
        .centerX().mirrorY()
        .color("WhiteSmoke")

    fun line( fromX:  double, fromY : double, toX : double, toY : double ) =
        line( Vector2(fromX, fromY), Vector2(toX, toY) )

    fun line( from : Vector2, to : Vector2 ) : Shape2d {
        val across = (to-from).normal().unit()*2
        return PolygonBuilder().apply {
            moveTo(from)
            lineTo(from+across)
            lineTo(to+across)
            lineTo(to)
        }.build()
    }

    fun box( name : String ) : Shape2d{
        return Square( 60, 40 ).center().color("DarkGreen") +
            Text( name ).center().color("MintCream")
    }

    // A simple circuit diagram
    fun circuit() : Shape2d {
        val switch = box("Switch").translateX(-270)
        val led = box("LED").translateX(-180)
        val boost = box("Boost").translateX(-90)
        val battery = box("Battery")
        val charger = box("Charger").translateX(90)


        val plusToSwitch = line( -30,0, -60, -30 ) +
            line( -60,-30, -210,-30 ) +
            line( -210, -30, -240, -5 )

        val switchToCharger = line( -240,5, -210, 30 ) +
            line( -210,30, 30,30 ) +
            line( 30,30, 60,5 )

        val chargerToBoost = line( 60, 20, 25,50 ) +
            line( 25, 50, -25, 50 ) +
            line( -25, 50, -60, 5 )

        val boostToLED = line( -120, 10, -150, 10 )

        val batteryToCharger = line( 30,0, 60, -10 )

        val posLines = plusToSwitch + switchToCharger +
            chargerToBoost +
            boostToLED

        val negLines = batteryToCharger +
            chargerToBoost.mirrorY() +
            boostToLED.mirrorY()

        val text1 = Text( """On Charger :
    'B+' goes to the switch
    'B-' goes to battery's negative
    'out+' goes to boost's 'in+'
    'out-' goes to boost's 'in-'

""" ).translate(120,40)

        val text2 = Text( """On Boost :
    'out' connects to the LED
    'in' connects to the charger's "out"
""").translate(-180,-70)

        return led + switch + boost + battery + charger +
            posLines.color("Red") +
            negLines.color("Black") +
            text1 + text2
    }

}